 Stretch Material Command
- Step-By-Step
- Undo
- Tips and Tricks
- Related Tools
1 . Preselect one (1) or more materials to enable the Materials contextual page and click the Rotate Multiple Material icon found in the Modify section. Skip step 2.
Alternative : Invoke Stretch Material using the Find Tool by searching the command name and clicking the Stretch Material icon, which is pictured above. Proceed to step 2.
Learn more about alternative methods for launching commands.
2 . Select one (1) or more materials.
▸ Right-click and select "OK" from the shortcut menu.
▸ Press the Enter key.
Alternative : You can press the Esc key or right-click and choose "Cancel" on the shortcut menu to end the command.
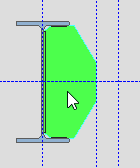
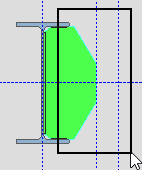
3 . The status line prompts, " Locate material STRETCH/MOVE box. " Hold down the left mouse button ( Locate ) and drag the mouse pointer ( ![]() ) to form an area box around the material vertex points that you want. Then left-click ( Yes ) to confirm the area enclosed by the rectangle is correct.
) to form an area box around the material vertex points that you want. Then left-click ( Yes ) to confirm the area enclosed by the rectangle is correct.
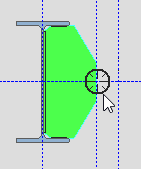
4 . The status line prompts, " Locate a reference point ." Place the pointer ( ![]() ) so the target (
) so the target ( ![]() ) is located where you want the material stretched from, then left-click ( Locate ).
) is located where you want the material stretched from, then left-click ( Locate ).
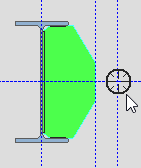
5 . Left-click ( Locate ) a second point when the target ( ![]() ) is located where you want the material stretched to.
) is located where you want the material stretched to.
6 . The status line prompts, "Verify material stretch operation." Left-click ( Yes ) to confirm that the stretch operation is correct. Right-click ( No ) if you want to go back to step 5 and locate a different second point.
7 . The Change All Options window opens, informing you that stretch operations will be added.
Option 1 : Select the options you want and click the "OK" button to complete the Stretch Material command.
Option 2 : Click the "Cancel" button to close the window and end the Stretch Material command. The material remains unchanged.
1 . Open the stretched material's edit window (e.g. double-click the material, or hover the material and choose " Edit Other " on the context menu ).
1a : If the stretch operation caused the entry field values (length, width, etc.) in the material edit window to change, you need to manually adjust the affected entry fields to return the material to its pre-stretched dimensions.
1b : Press the " OK " button at the bottom of the material edit window.
2 . If the stretch operation made changes that did not affect the entry field values in the material edit window, a Yes-No dialog opens with the question, "Do you want to regenerate this material to clear user modified material operations?"
2a : Press the " Yes " button.
3 . The Change All Options window opens, informing you that "Material will be regenerated" and "Stretch operations will be lost."
3a : Select the options you want and press the " OK " button.
4 . The material is regenerated per its edit window settings.
- Depth checking (affects Stretch Material )
- Point selection by area box (affects Stretch Material )
- Vertex points ( Stretch Material relocates the position of)
- Move/Stretch Members (to "stretch" main material)
- Move/Stretch Members, Include Material (to "stretch" main material plus move material)
- Edit Material (can be an alternative to Stretch Material )
- MemberMaterial.Material.SubMaterial.IsMaterialStretched (Report Writer)

